This manual describes the functions of the Minicam that the MMT operator
controls, such as the autoguiding, pointing updates, collimation and focussing.
As well, the CfA guide program that minicam uses and which is also used
as a general purpose guider for other MMT instruments is contained.
Some problems with minicam and how to deal with them are copied here from
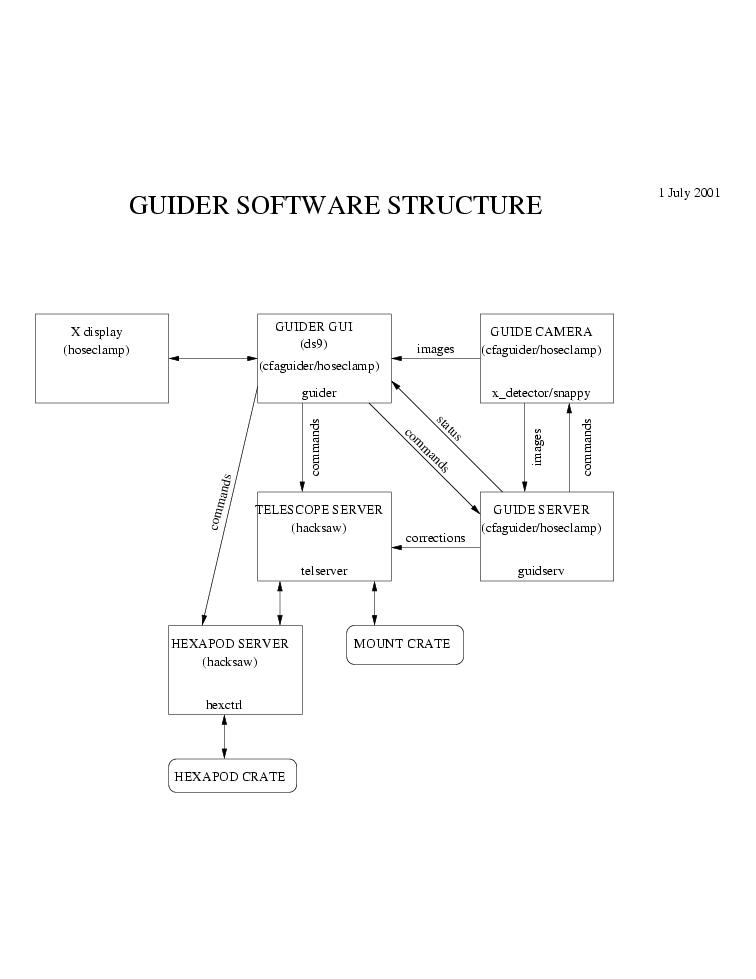
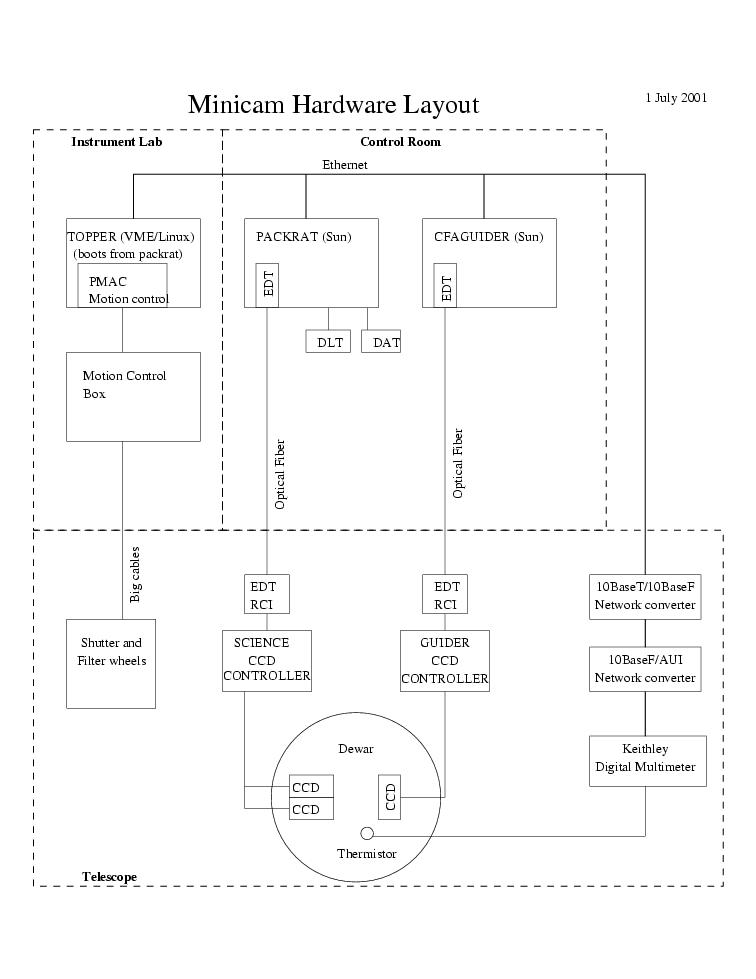
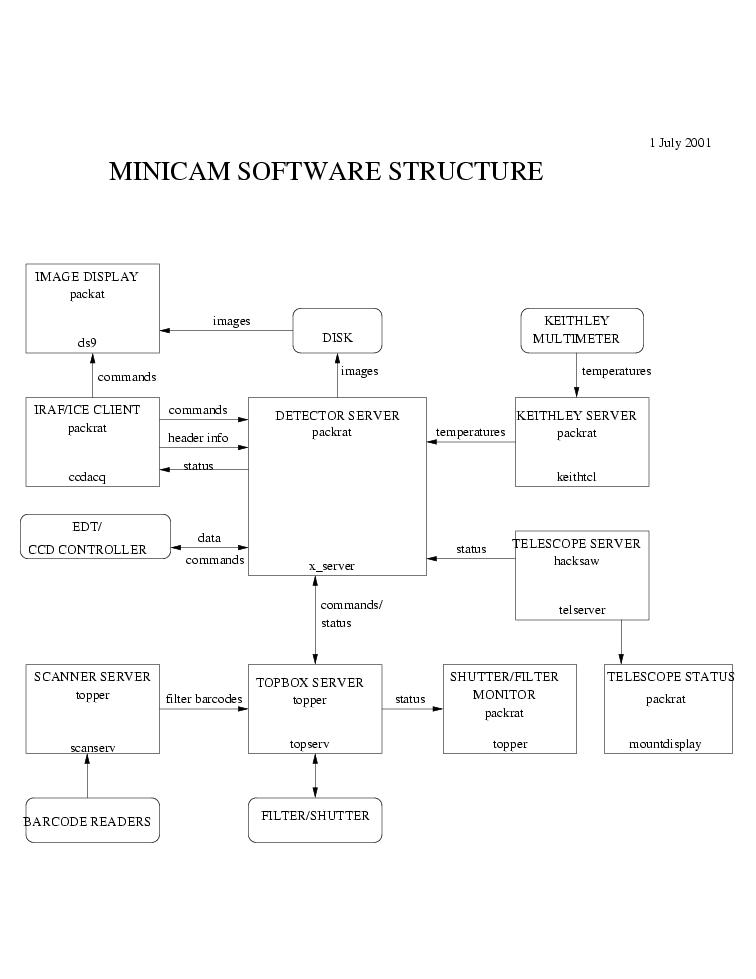
the observers manual. Finally, diagrams of the hardware and software structures
are shown, as an aid in debugging instrument problems.
I. Pointing Corrections. This can be
done by the observer, and in any casemust be done on packrat. To correct
the pointing, take an image within ICE using "observe" and then use the
"Fix Pointing" tool in the Observe menu of mc9. It will place a
red and a green marker on the screen. With the left button drag the red
marker to the location of the target. Drag the green marker to the desired
location. When you click OK, Az/El offsets will be sent to correct the
pointing, and revised Mc-Offsets will be sent if you changed the location
of the green marker. If you want to dither the object around the CCDs,
the way to do this is to change the McOffsets. Either the operator can
type them in, or you can use the "Fix Pointing" tool. If you want to change
the location of the object on the CCDs, say because you want to dither,
or the object falls on a bad part of the CCD, the best way of doing this
is to change the McOffsets slightly.
Focusing, Collimating, and Guiding are typically done by the operator. Run the guider on the hoseclamp display, by doing an xhost +cfaguider on that display, rlogin to cfaguider (rlogin cfaguider -l mccd), type gservers restart and then type guider. (Autofocusing using the two sides of the guide CCD is not implemented for the F/9 Focus, but rather will be used for the f/5 focus, when it is available.)
This window, which allows control of guiding will appear:
What you see are three separate images. At the bottom is the entire
guide CCD, with a dark vertical line down the middle indicating the edge
of the glass that covers half of the CCD. Green circles select
small areas that are expanded in the the upper two images. Each of
these 3 images can be zoomed by clicking on the Left Mouse Button (LMB)
in that subwindow, and then selecting the "zoom" panel, and then zooming
in or out.
- Click on the Guide button (as opposed to the guide menu above it), to bring up the guide function buttons.
- Use the pull down menu for Guide, and select mode and then select centroid 1 box, which means only one green cirlcle and hence one guide star will be employed in the guiding. Also in this menu, select the error control and image control windows.
- Click on Full Acq. This will take an exposure in the normal way (the shutter will open and close, and the CCD will be readout). Parameters of this exposure are controlled under the "guide" pull-down menu, image control submenu. Typically, a 2 second exposure is taken. Inspect the displayed image (the lower panel). If there are one or two good stars visible you may proceed. Otherwise, you may want to increase the exposure time. If there are no stars on the guide CCD's, slew to a good star, and put that on the guide CCD's using the McOffsets of AZ= +250 EL=95.
- Using the LMB, move the green circle till it is are centered on your star.
- Click on Start to begin the exposure.
- Click on Tweak. This will recenter the star(s) in the box, by taking one exposure, finding the center, moving the box, and then taking another exposure.
- You may need to click on ReScale to get the guide box images to look good.
- Now click on the Focus button to bring up the focusing options.
- Focus steps should be no smaller than 20 units (which are microns). The increment size can be changed by putting the mouse in the increment box and typing in the new values.
- Click on the up or down buttons to change focus. Monitor the quality by inspected the star image in the box.
- Click on Stop (same place as Start was) to stop exposing.
III. Collimating.
Do as for focusing above, but bring up the collimate menu by clicking
on the collimate button. Again the size of the changes can be adjusted.
Tilt motions in +X,-X, +Y, -Y are made by clicking on those buttons.
Note that the Az and El correction buttons in the error control
window should be selected, to allow the telescope to be moved to compensate
for the collimation changes (and thus keep the stars in the same position
on the CCD). The collimation routine is changing as of July 2001.
IV. Autoguiding. If you want to autoguide,
you must start the autoguider before you begin an exposure. Otherwise,
the shutter protocol will not work (the shutter would close during your
exposure). Also, the obspars parameter file must be set properly, particular
the parameter longexposure should be 10 seconds. See the obspars
help page. To begin guiding:
- Click on the Guide button (as opposed to the guide menu above it), to bring up the guide function buttons.
- Click on Full Acq. This will take an exposure in the normal way (the shutter will open and close, and the CCD will be readout). Parameters of this exposure are controlled under the "guide" pull-down menu, image control submenu. Typically, a 2 second exposure is taken.
- Inspect the displayed image (the lower panel). If there are one or two good stars visible you may proceed. Otherwise, you may want to increase the exposure time, or move the telescope.
- Pull down the guide menu, and the mode submenu. Select the centroid 1 box.
- Using the LMB, move the green circle till it is centered on the star.
- Click on the Box Acq button. The CCD will now be read out in a small box around the star(s) which will be displayed in the upper frames.
- Click on Tweak. This will recenter the star(s) in the boxes, by taking one exposure, finding the center, moving the box, and then taking another exposures.
- Click on Start to begin guiding.
- You may need to click on ReScale to get the guide box images to look good. Or use the scale pull-down menu. Try using zscale, linear or minmax. For collimating and focusing, you want a low-contrast image, whereas for guiding, you want a high contrast image.
- Click on Stop (same place as Start was) to stop guiding.
The acquisition sometimes gets hung. In this case, click on the Guider Reset button in the minicam status window.